Background
A proportion of the laser excitation energy is absorbed as it passes through the sample. This means that for some thicker samples with higher levels of biomolecules that absorb imaging wavelengths, the effective laser intensity for illumination and excitation is progressively reduced as we image deeper into that sample. This can result in reduced fluorescence within these thicker samples if we do not adjust the laser intensity to compensate through Z. Fusion provides the function to adjust the intensity of the laser so that a uniform emission throughout the sample can be achieved.
When to apply Z Intensity Correction?
Z intensity correction is intended for thicker, dense tissues that contain biomolecules that absorb light used for imaging within the UV/Vis range. Z intensity correction would not be applicable to thin samples such as cell monolayers, cleared or relatively transparent tissues. If you observe a Z stack of a sample and observe a noticeable reduction in intensity through Z, then the Z correction will allow this to be corrected.
Settings
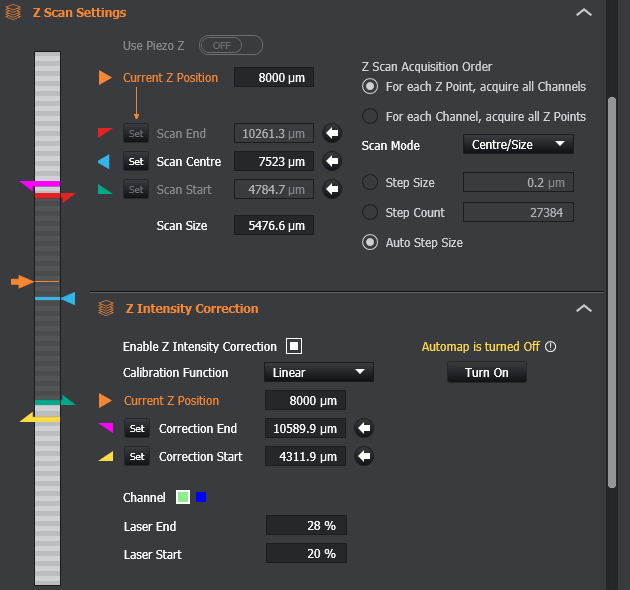
The settings to adjust the Z Intensity Correction are under the protocol tab under Z Scan settings. These settings enable the laser intensity correction to be be optimised as appropriate to the characteristics of the sample as this can vary significantly between samples.
-
Enable Z Intensity Correction checkbox - toggle the Z Intensity Correction functionality on and off as is required.
-
If you do not want to use Z intensity correction check that the Z Intensity Correction settings are not enabled as these may be hidden if the panel has been minimised (if the Z Intensity correction is enabled the yellow and pink start and end markers would be present on the Z slider indicator.
-
-
Automap status message and button - shows the status of automap and provides a button to turn it on and off. When you enable Z intensity correction it automatically deactivates the automap, as automapping would otherwise adjust the brightness of displayed images making it more difficult to assess what laser power should be set at different z positions. It is recommended that Automapping remains off whilst setting the calibration values for Z Intensity Correction.
-
Calibration Function - select the mathematical function that is best suited to the attributes of the sample for intensity correction:
-
Exponential - laser power increases exponentially with Z. This function is based on the Beer-Lambert law, and provides an exponential response to laser power decay relative to sample depth and would therefore should provide a close match to most samples.
-
Linear - laser power increases linearly with Z. Provides a simplified model for laser intensity decay within the sample. A linear correction may be desirable for samples that do not show a more typical exponential response.
-
-
Current Z Position - defines the current position of the Z stage. The current Z position is indicated on the vertical slider as an orange marker.
-
Correction Start/Correction End - set the range of z positions over which the correction will be applied for the sample.
-
The correction start/end have their own corresponding slider markers:
-
Pink for correction end
-
Yellow for correction start
-
-
Note that the Laser power will remain at a constant outside the Z intensity correction range. It will remain equal to the intensity values specified for the Laser Start, and Laser End fields (see below).
-
-
Channel selector - each channel can be calibrated independently, meaning each channel can have its own Laser Start/End values.
-
Laser Start/Laser End - set the laser intensity at the start and end of the correction range. Navigate to the start and end of the correction range, and manually determine the laser intensity required to deliver a uniform response at these positions.
How to set Laser Intensity
Setting the laser intensity should be done in Live mode and setting the correction values for Laser Start and Laser End so that a similar level of counts is obtained. It is possible to estimate this visually, or by highlighting similar features and comparing the counts and this may be useful for some samples. However, for most samples, it is recommended to use the data histogram to help set suitable corrections. You can set the histogram axes and view the counts distribution and values displayed. This will help ensure the most uniform response through the specimen.
Notes
-
Once a protocol run is complete, the laser intensity values will return to the value that was previously entered in the active channel.
Video Tutorials can be found here: Z Intensity Correction