Creating a Channel
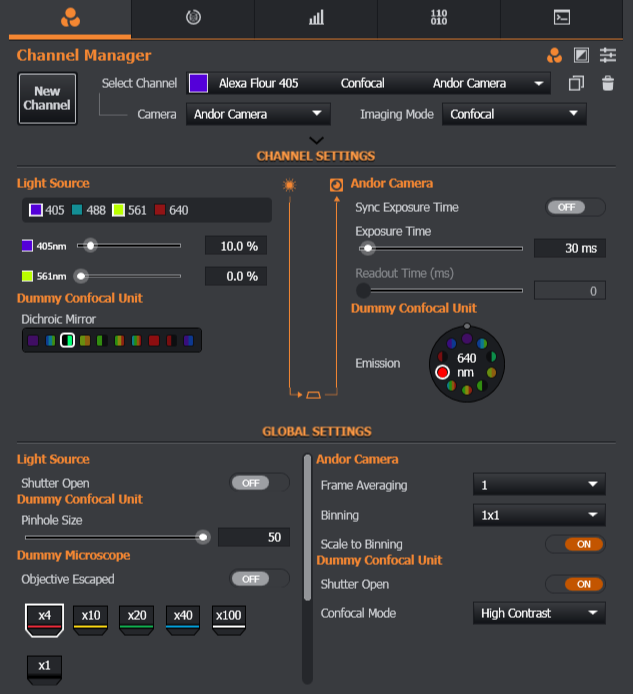
Channels are settings files, created and managed in the Channel Manager. Channels specify all the settings for capturing an image of a specimen in a given Imaging mode, or with a specific fluorescence probe e.g. DAPI or TRITC.

For more information on Channels please view the Concepts in Fusion topic Channels. A channel must therefore be created in Channel Manager and then added to a protocol so that images may be acquired according to your required parameters.
How to create a Channel
To create a new channel:
- Click on the Expander tab.
- Click on New Channel.
- Select your Camera from the Cameras available from the drop-down box.
- Enter the Wavelength e.g. 405 nm.
- Change the Name from the default name so that the new channel may be easily identified e.g. Alexa Flour 405.
- Select the Imaging Mode that the channel will run in e.g. TIRF.
- Turn on the Light Source by clicking the Light Source options.
- Set the laser intensity as required using the slider bar, or enter a value directly in the laser output field.
The new channel will now appear and may be selected in Protocol manager to add to your protocol. These steps are shown in the section Creating a Protocol.
To view a video tutorial on this topic, click Creating a New Channel.mp4.
An outline of the options available in Channel Manager may be viewed at Channel Manager Tab.