The main control panel is the “Remote Panel” which provides easy access for adjusting the imaging conditions (Channels) and executing the acquisition Protocols. The Remote Panel is usually visible and provides the most commonly used control-set for acquiring multi-dimensional image data.
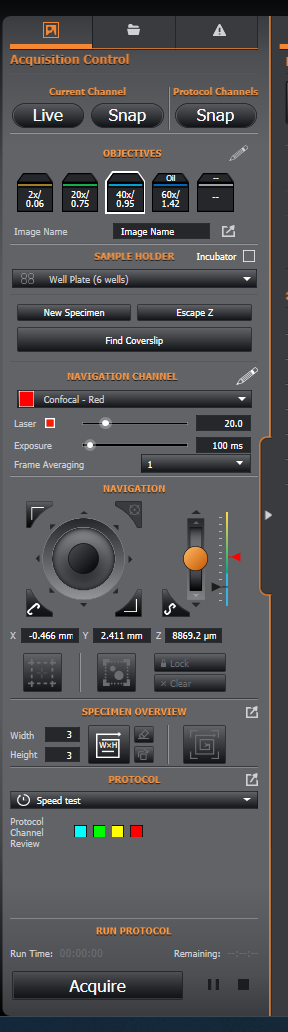
ACQUISITION CONTROL
(Current Channel) Live: acquire a live image of the navigation channel into the window on the left hand side of the application.
(Current Channel) Snap: acquire a single image using the Navigation Channel.
(Protocol Channels) Snap: acquire a multi-Channel image using the Channels from the currently selected Protocol.
OBJECTIVES: The current objectives in the system. The magnification and numerical aperture are displayed for each objective. Hovering the mouse over an objective will provide a tooltip with some further information. When switching to or from an oil objective, you will be prompted to clean the objective and slide. For further information see Oil Objectives
Image Name: This will form the basis of the filename of any images acquired. Additional properties can be added to filenames such as Date, time, channels etc. via File manager Preferences
SAMPLE HOLDER: This allows you to select the sample holder type you are currently using. If using an Incubator, this can be specified by enabling the Incubator checkbox. This will apply an offset to any movement in Z, which can be specified in Hardware preferences
New Specimen: This button will clear any previously set navigation bounds and escape the current objective. This is designed to quickly help you after load a new sample.
Escape Z: This will escape the current objective. Once the objective is escaped, this button will then allow you to refocus the objective.
Find Coverslip: This will attempt to automatically locate the coverslip in the Z plane. For further information and a list of supported objectives, Supported Objectives
NAVIGATION CHANNEL: dropdown to select the desired Navigation Channel – it does not have to be a Protocol Channel. For Live imaging and setup we recommend using the longest wavelength for minimal photo-toxicity. You can quickly adjust the exposure time & Laser/LED power of the navigation channel here.
Clicking the pencil icon will allow you to edit the name and lookup table of the channels. See Channels
NAVIGATION: The joystick on the left hand side provides control of the XY stage, while the arrows around the control provide large and small nudge movement in eight directions. The triangular button on the bottom-left of the control allows you to switch movement between Coarse, Fine and Superfine.
The triangular buttons at the top-left and bottom-right of the joystick allow you to set the top-left and bottom-right boundaries respectively. See Specimen Navigation for more detail.
The rocker and heatmap slider on the right hand side allow control of the Z stage. The rocker speed can also be toggled between Coarse, Fine and Superfine. It also provides small and large nudge movements in both directions.
The heatmap allows more direct control of the Z stage by clicking and dragging the black slider. The heatmap is designed to give an imprecise overview of when the sample is likely to be in focus.
Blue = unlikely to be in focus. Yellow = less likely to be in focus. Green = More likely to be in Focus.
The red slider is used to set the maximum position that can be navigated in Z. This is used to reduce the likelihood of crashing your objective into the stage.


This feature is most useful with high mag or large montage images. Defining bounds around your sample will prevent you moving away from the same or losing it in the field of view.

For a more details breakdown of stage navigation using the joystick and rocker, please see Acquisition Control
SPECIMEN OVERVIEW
Quick WxH Montage: This option runs a quick Width x Height montage with 1 time point, current Z position and using the navigation channel. The acquired image is then stitched together using high speed settings. This is useful to gain a quick overview of your specimen. Click again for an extended view.

Clear the overview: Saving image to Gallery

Show the current overview

Quick bounded montage: This will run a quick montage on the area within the stage bounds. It is similar to the Quick WxH Montage, however it will acquire as many tiles as are needed to image the entire bounded area. Only available after bounds have been set.

Note: Further montage options can be defined using a Montage
PROTOCOL: The protocol section of the panel provides a dropdown list of all defined protocols, allowing you to easily switch between them. The channels for the selected protocol are also displayed, allowing you to quickly review them.
A video guide can be seen here: Image Acquisition Tools: The Remote Panel