Channel and Global Settings
Channel Manager
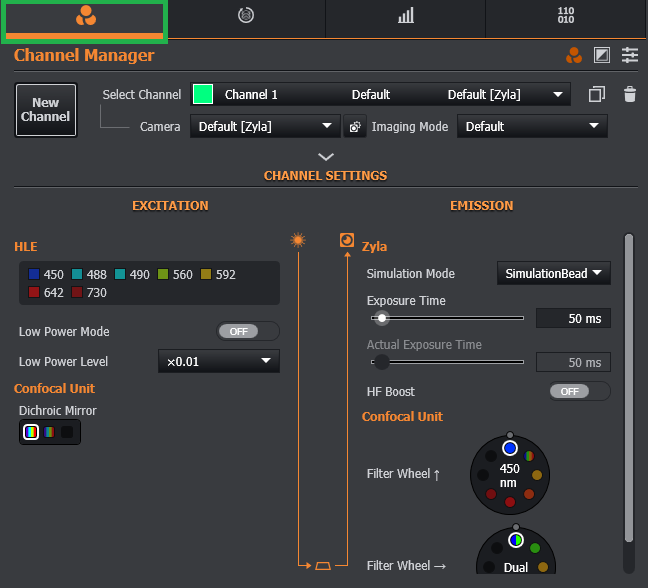
To create a channel, please ensure to have an appropriate imaging mode created. To do this, open Imaging Mode Manager within Channel Manager tab (Imaging Mode and Feature Locations), where almost all device settings locations can be defined.

The top section of the Channel Manager Tab enables the following parameters to be set for the channel:
- Select a camera associated to the new channel
- Define the Imaging mode that will be used
- Give the channel a name
- Define the excitation wavelength

New Channel: Create a new channel. Please view the topic Creating a Channel for information on how to create a new channel.
Select Channel: Use the drop-down list to view the channels associated with the current protocol and unused channels. The Add and Remove buttons can be used to add or remove channels from the currently selected protocol.
Camera: Select the camera to be used with the current protocol.
Imaging Mode: Select the imaging mode that is to be used with the current protocol. The available modes include:
- Spinning Disk Confocal
- Widefield
- Brightfield
- TIRF
- Unknown Modality
- Photostimulation
Name: Enter an appropriate name for the selected channel.
Wavelength: Select the excitation wavelength.
Lookup Table: Change the colour scheme for display of the selected channel. The available colour palette options are:
- Colour
- Bone
- Calcium
- Hot
- Jet
Channel Colour: Select a custom colour from the selected colour palette to identify the channel. This is only available when Auto Colour is set to OFF.
Auto Colour: When Auto Colour is ON, the channel will be displayed in a colour to match the excitation wavelength of the currently selected channel.
Description: A description for the channel and associated information can be entered in the description box,
The Copy button can be used to copy the current channel information- for example to speed up creation of new channel with similar settings. Delete will delete the currently selected channel
Channel Settings
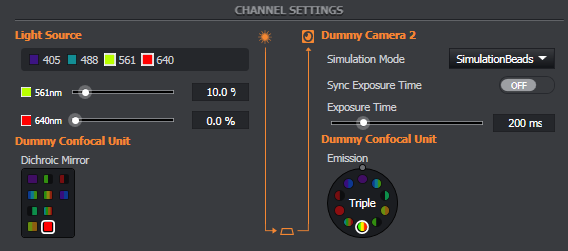
Channel settings displays the channel information in a logical order from light source, filter settings of the confocal unit and camera exposure.

Light Source: The available laser wavelengths are listed. Each laser line source can be selected as required, intensity can be set using the slider bars or entered directly as % of maximum power. Dragonfly offer 2 laser engines; ILE (Integrated Laser Engines) and HLE (HLE & VLE - High-Powered Laser Engine & Versatile Laser Engine).
Confocal Unit: Select the Dichroic Mirror and Emission filter positions that will be used for the current protocol.
Camera: Enter the required exposure settings for the camera associated with the protocol. Note that the desired exposure time may not be possible- in this case a value as close as possible will be used.
Sync Exposure Time: When enabled, this feature will ensure that the exposure time is rounded to a suitable value for the confocal device currently connected. For example, with a Dragonfly system this will typically be rounded to the nearest 2.5 ms.
Global Settings

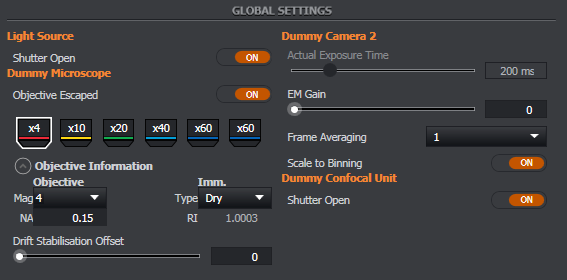
Light Source: Set the master shutter of the laser combiner to open (ON) or closed (OFF). When the master shutter is OFF no laser emission is possible. Refer to the hardware guide supplied with the laser source and laser combiner for information on laser safety information and interlock function.
Microscope: View or enter information for each objective. This includes:
- Lens Magnification
- Numerical Aperture
- Objective Type e.g. oil immersion. Note it is possible to select custom as an objective type and enter the required refractive index in the refractive index
- Drift Stabilisation. Drift stabilisation enables a compatible microscope to maintain a lock on the coverslip to help prevent drift between the objective and coverslip occurring over long (e.g. hours / days) experiments. See the Drift Stabilisation section for more details.
Camera: Set the following camera parameters:
- Actual Exposure Time: Set the exposure time to be used in acquisitions.
- EM Gain: Set the EM gain level when an EMCCD camera is used in EM mode e.g. Andor iXon Ultra series
- Frame Averaging: Set the number of acquisitions that are averaged to generate a single frame. Default is 1- i.e. one acquisition will generate one image frame. Increasing the value may increase the signal to noise ratio- however this may introduce blurring to moving objects.
- Scale to Binning: When binning is used to boost increased frame rates at the expense of resolution, scale to binning automatically scales the exposure time when binning settings are changed- therefore keeping the contrast of the image at a comparable level.
For a full description of all of the camera settings, see the Devices section.
See also SRRF-Stream.
Confocal Unit: Set the laser port shutter of the confocal unit to open or closed.