Export operations
Enables the current displayed image to be exported:
-
Export to clipboard
-
Export to file (allows image to be saved as JPG, Bitmap or PNG formats)
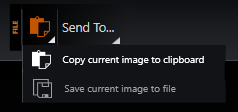
These tools export the entire image presentation area as it is displayed, including any borders that are around the image. You can therefore adjust the zoom and angle of the view to reflect how you would like the image to appear in the exported file.
Note that to export an image without any border area, the application window should be resized and the zoom adjusted so that the dimensions of the display area match those of the image you wish to export.
Send To...
Send files to Imaris.

Drawing and Mapping Tools
This section outlines the functions available from the Drawing and Mapping Toolbar.

Navigation & Drawing Tools
-
Move Use the left mouse button to move 2D images. For 3D images, use the left mouse button to move the image, use the right mouse button to move 3D images.
-
Select Select an overlay by selecting it directly or by drawing a rectangle around it. To select multiple overlays hold down the Ctrl key while selecting the overlays.
-
Move To Clicking on a Preview Montage image will move the stage to that location. See the Specimen Navigation section for details of the Preview Montage function.
-
Line Overlay. The following drawing options are available, depending on the current view mode. For example, drawing tools may be unavailable in MIP or 3D views. See Image Tools for descriptions of these view modes.
Right-click the icon or left click the white triangle in the bottom left corner of the button:-
Line
-
Point
-
Rectangle
-
Ellipse
-
Freehand Line
-
Freehand Shape
-
-
Shape Operations Provides unite, subtract and intersect functions.
-
Overlay Manager Displays the Overlay Manager
To find out how to use the drawing tools, please refer to the section Overlays.
Mapping Tools
Contrast Can be clicked 10 times (10 different mapping options)
By clicking on the icon, the user will select the best mapping option for the image.

Note: the bar under contrast will only appear when using White Light channels. This will show you the ten steps as clicked.
EPI and Confocal will not have the contrast bar.
Auto-Map
Automap will constantly adjusting the brightness and contrast of the image histogram. We recommending toggling off Auto-map, once mapped.
Manual Mapping Dialog Manually adjust the Look Up Table (shown below) used to render the current frame.
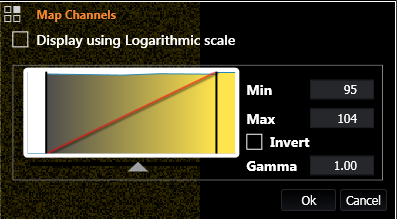
To find out more about using the mapping functions, please refer to the section Contrast.
AOI Tools
Use the AOI tools to set an Area of Interest (AOI) for subsequent acquisitions.
-
Set a predefined AOI - Select from a list of predefined AOI values.
To find out how to use the AOI functions, please refer to the section Setting an Area of Interest (AOI).
Binning
Adjusts the image resolution by combining data from multiple adjacent pixels into one.