1. In Table view navigation the user can:
-
have more information on the selected positions,
-
modify a specific position,
-
modify the acquisition order,
-
navigate to any of the listed field positions
-
delete any of the listed field positions
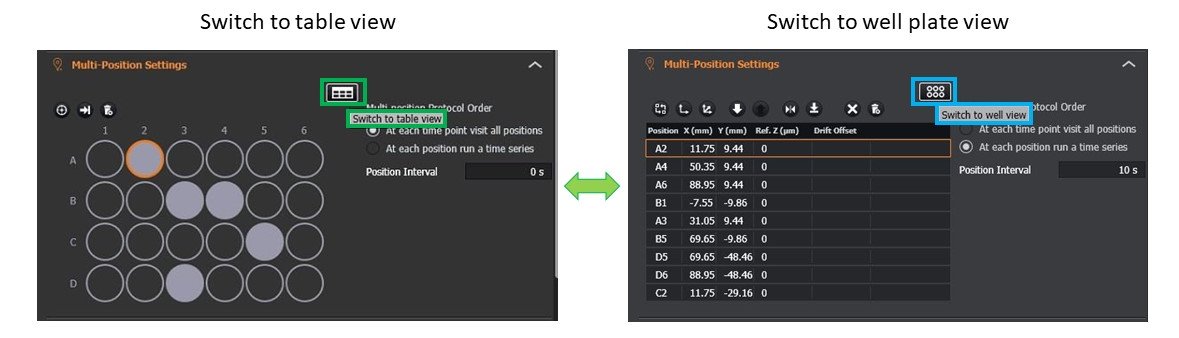
Click on the table highlighted in green will move from Navigation in Well-plate View to Navigation in Table view.
Click on the well plate highlighted in blue to move from navigation in table view to Navigation in Well-plate view.
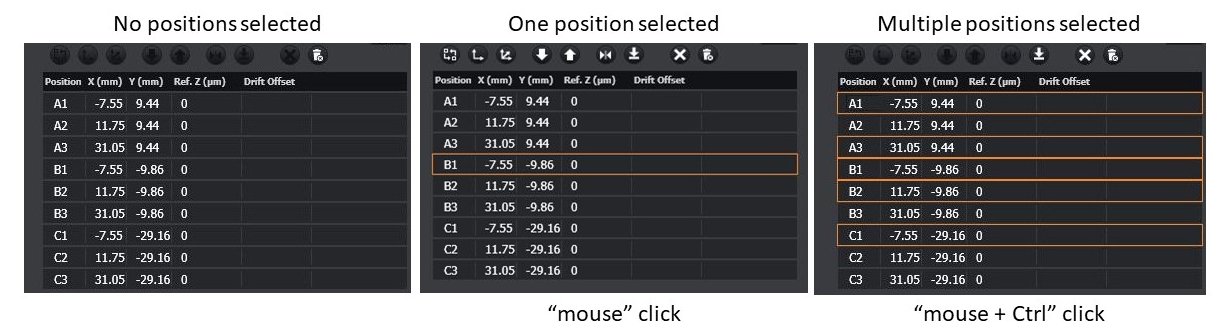
2. In table view selected positions are highlighted in orange
-
Click with the "mouse" on the specific entry to select a position.
-
Click with the "mouse + Ctrl" to select multiple positions.
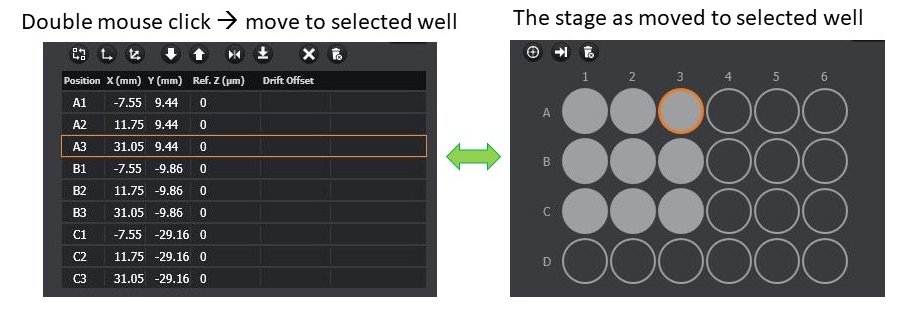
3. Double click in a table entry to move to a selected position.
-
Spatial information of the selected position relative to the well plate can be quickly accessed by clicking on well plate view.
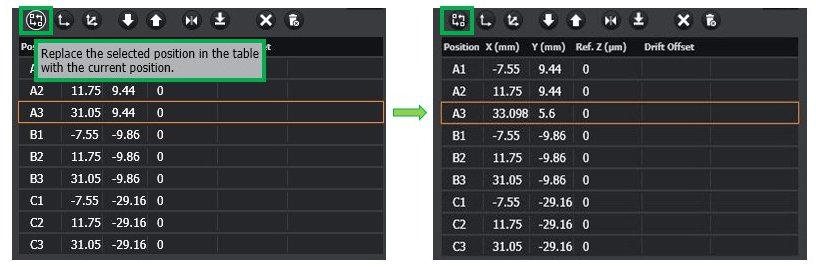
4. The selected positions can be replaced by new positions.
-
Using the navigation tab or the joystick move to the new position.
-
Click on the icon highlighted in green to replace the old position with the new one.
5. The same XY offset to all positions can be applied by clicking on the icon highlighted in green.
-
The user can adjust all the positions by adding the same XY offset.
To apply the same offset:
-
Click in one of the selected positions (example B1).
-
Move (B1) to a new position.
-
Click on the icon highlighted in green.
-
A warning will appear.
-
Click OK → All the positions selected will be updated, with the same XY offset that was added to B1.
-
Click cancel → If you do not want to update all the positions.
-
If you want to update B1 only - see the point 4 of this page.
-
-
-
On the table bellow position, B1 was moved in X direction by 1.024 um. There was no update on the Z position.
-
By clicking on "apply the current XY offset to all positions" (highlighted in green) all positions were updated in X by 1.024 um.

6. The same XYZ offset to all positions can be applied by clicking on the icon highlighted in green.
-
The user can adjust all the positions by adding the same XYZ offset.
To apply the same offset:
-
Click in one of the selected positions (example A2).
-
Move (A2) to a new position.
-
Click on the icon highlighted in green.
-
A warning will appear.
-
Click OK → All the positions selected will be updated, with the same XYZ offset that was added to A2.
-
Click cancel → If you do not want to update all the positions.
-
If you want to update A2 only - see the point 4 of this page.
-
-
-
On the table bellow position, A2 was moved in X direction by 2.788 um, in Y by-2.917 um and in Z by 3.4 um.
-
Note that the starting positions do not need the same Z to be updated.
-
The same offset XYZ added will be updated to all the positions the table.
-
-
By clicking on "apply the current XY&Z offset to all positions" (highlighted in green) all positions were updated in X by 2.788 um, in Y by-2.917 um and in Z by 3.4 um.

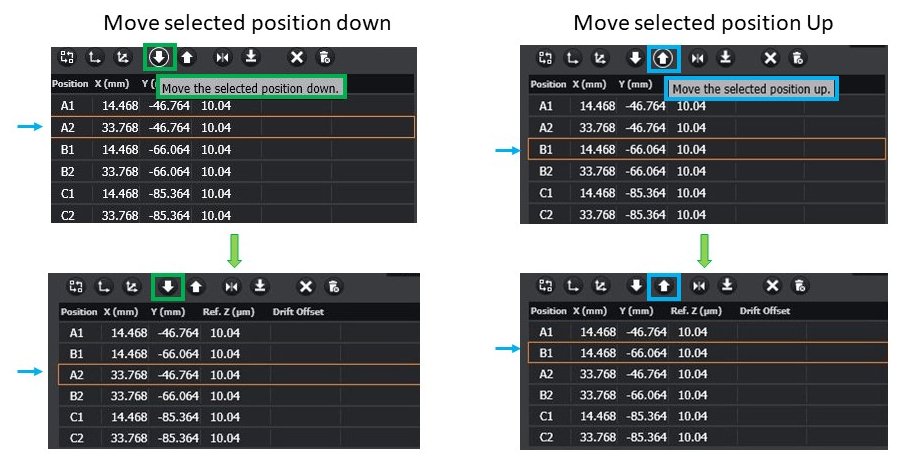
7. The order of the positions in the table can be modified.
-
Click on the down arrow (highlighted in green) to move a position down.
-
Click on the up arrow (highlighted in blue) to move a position up.
-
The order of the positions on the table will reflect the order of acquisition. For more information go to point 7 of Navigation in table view page
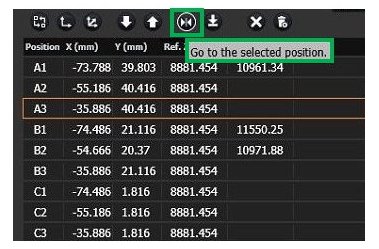
8. Navigate to a selected position by:
-
clicking on the icon highlighted in green;
-
double click on the specific position.
9. Navigate to the next position in the table by:
-
clicking on the icon highlighted in green.

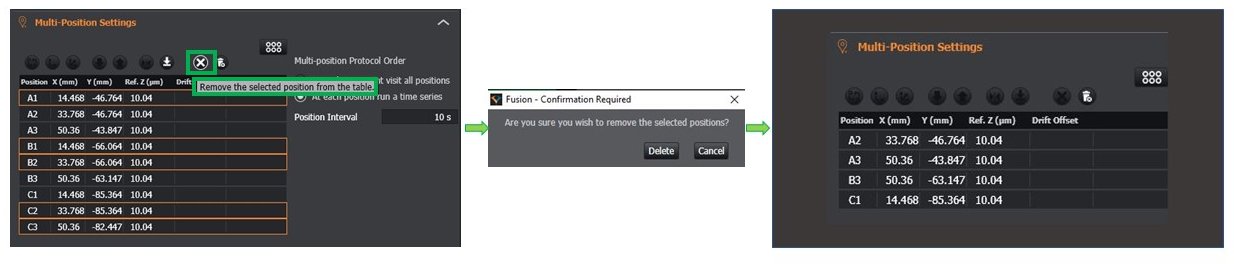
10. Delete one or more selected positions by clicking on the icon highlighted in green
-
select one → click on the position to select
-
select multiple continuous positions→ click "Shift+ mouse left key"
-
Select multiple non-continuous positions → click "Crtl + mouse left key"
-
Upon selection, a warning will appear
-
Click delete → if you want to delete ALL the selected the positions.
-
Click Cancel if you do not want to delete at least one of the selected positions.
-
11. Delete all the position from the table by clicking on the icon highlighted in green
-
Upon selection, a warning will appear
-
Click delete → if you want to delete ALL the positions in the table.
-
Click Cancel → if you do not want to delete at least one of the positions in the table.
-

12. The user can now run a protocol.
-
The selected positions have to be combined with the acquisition channels (see adding channels to a protocol).
-
Multiwell positions can also be combined with other protocol features such as time series, Z scan, montage, drift stabilization settings, image processing and loop options.
-
Go to Creating a Protocol to have more information on the specific protocol type you want o combine with the multi-well positions.
-
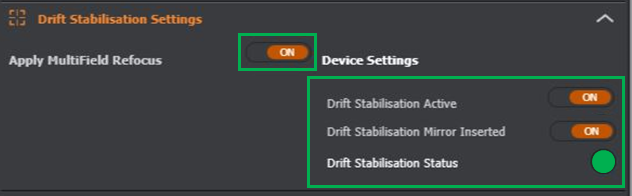
Note:
Important reminder for Leica DMI8 and Olympus ZDC
If the user decides to use the focus drift correction on a multi-well or a multifield multi-well experiment. The Drift stabilisation must be activated each well (or position).
Go to Navigation in Well-plate view to have more information on spacial navigation visualizing the well plate.